Table of Contents
Hello everyone, in this article we will try to make a Modern React Native Splash Screen Design to be used in the starting of our app.
The Splash Screen is the first starting point of your users, and the first impression they will have about your app, comes from it.
So it’s only logical that we try to make it at it’s best form, and make it tell a lot about our app’s features and services, before the user get’s into the login and sign up stage.
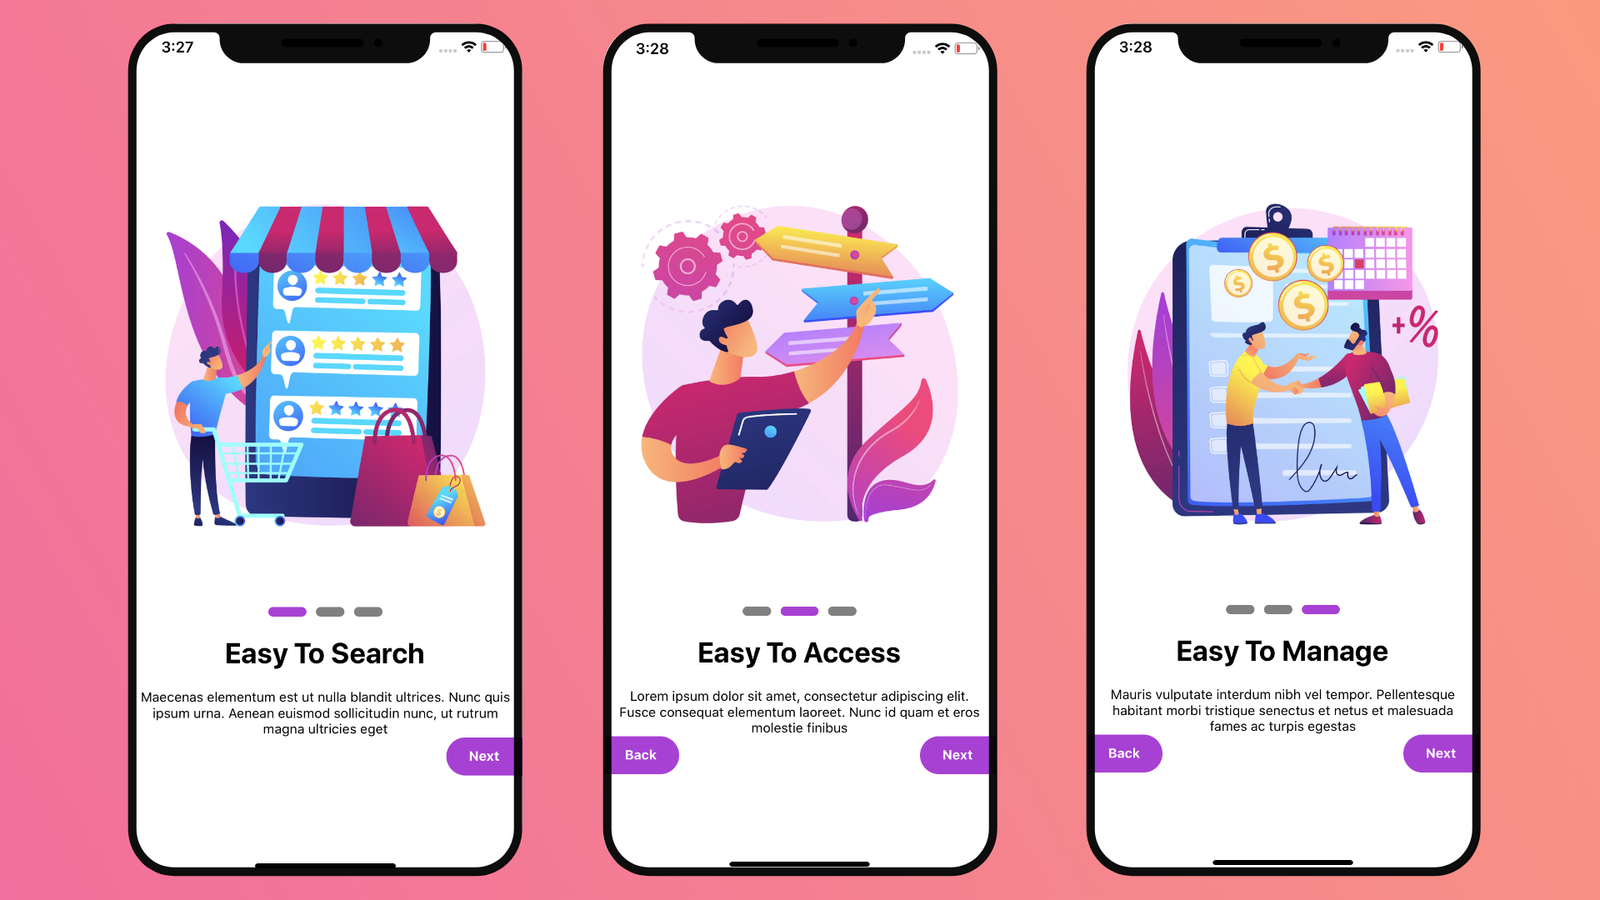
In our example we will have 3 different features for the app, and each will be displayed with an image, title and a description of the feature.
We’ll use a slider view for the user to navigate between the features, till the last one, which will navigate him to the main screen of the app.
The Final Result will look similar to this.

React Native Splash Screen Setup
For this splash screen design we won’t need to install anything, as we won’t be needing to use any external components.
So after you setup your React Native Project, either with the CLI or Expo. you can get started right away.
I have prepared 3 splash screen data for this example, you can make up your’s or use mine, it’s up to you.
We will create a new state to store it.
  const [ steps, setSteps] = useState([
    {
      image: require("./assets/search.jpg"),
      title: "Easy To Search",
      description: "Maecenas elementum est ut nulla blandit ultrices. Nunc quis ipsum urna. Aenean euismod sollicitudin nunc, ut rutrum magna ultricies eget"
    },
    {
      image: require("./assets/access.jpg"),
      title: "Easy To Access",
      description: "Lorem ipsum dolor sit amet, consectetur adipiscing elit. Fusce consequat elementum laoreet. Nunc id quam et eros molestie finibus"
    },
    {
      image: require("./assets/manage.jpg"),
      title: "Easy To Manage",
      description: "Mauris vulputate interdum nibh vel tempor. Pellentesque habitant morbi tristique senectus et netus et malesuada fames ac turpis egestas"
    }
  ])
Feel free use these images, you will find them in the github repository at the end of this article.
We will also need to make a new state to hold the slider feature currently selected, in order for use to navigate and display the appropriate splash screen data.
Full React Native Splash Screen Code
import React, { useState} from 'react';
import { StyleSheet, Text, View, Image, TouchableOpacity } from 'react-native';

export default function App() {
  const [currentStep, setCurrentStep] = useState(0)
  const [ steps, setSteps] = useState([
    {
      image: require("./assets/search.jpg"),
      title: "Easy To Search",
      description: "Maecenas elementum est ut nulla blandit ultrices. Nunc quis ipsum urna. Aenean euismod sollicitudin nunc, ut rutrum magna ultricies eget"
    },
    {
      image: require("./assets/access.jpg"),
      title: "Easy To Access",
      description: "Lorem ipsum dolor sit amet, consectetur adipiscing elit. Fusce consequat elementum laoreet. Nunc id quam et eros molestie finibus"
    },
    {
      image: require("./assets/manage.jpg"),
      title: "Easy To Manage",
      description: "Mauris vulputate interdum nibh vel tempor. Pellentesque habitant morbi tristique senectus et netus et malesuada fames ac turpis egestas"
    }
  ])
  const nextStep = () => {
    setCurrentStep(currentStep >= 2 ? 2 : currentStep+1)
  }

  const prevStep = () => {
    setCurrentStep(currentStep <= 0 ? 0 : currentStep-1)
  }
  return (
    <View style={styles.container}>
      <Image source={steps[currentStep].image} style={styles.stepImage} resizeMode="cover"/>
      <View style={styles.stepIndicatorView}>
        {steps.map((step, index) => {
          return (
            <View style={{...styles.stepIndicator,
              width: currentStep === index ? 40 : 30,
              backgroundColor:  currentStep === index ? "#A838D7" : "gray"
            }}></View>
          )
        })}
      </View>
      <Text style={styles.title}>{steps[currentStep].title}</Text>
      <Text style={styles.description}>{steps[currentStep].description}</Text>
      <View style={styles.navigationView}>
        {
          currentStep > 0 ?
            <TouchableOpacity
              onPress={() => prevStep()}
              style={{...styles.navigationBtn, borderTopEndRadius: 20, borderBottomEndRadius:20,}}>
              <Text style={styles.navigationBtnTxt}>Back</Text>
            </TouchableOpacity>
            :
            <View></View>
        }

        <TouchableOpacity
          onPress={() => nextStep()}
          style={{...styles.navigationBtn, borderTopStartRadius: 20, borderBottomStartRadius:20}}>
          <Text style={styles.navigationBtnTxt}>Next</Text>
        </TouchableOpacity>
      </View>
    </View>
  );
}

const styles = StyleSheet.create({
  container: {
    flex: 1,
    backgroundColor: '#fff',
    alignItems: 'center',
    justifyContent: 'center',
  },
  stepImage: {
    width: "90%",
    height: "50%",
    marginVertical: 30
  },
  stepIndicatorView: {
    flexDirection: "row"
  },
  stepIndicator: {
    height: 10,
    marginHorizontal: 5,
    borderRadius: 10
  },
  title: {
    fontWeight: "bold",
    fontSize: 30,
    marginVertical: 20,
  },
  description: {
    textAlign: "center",
    paddingHorizontal: 10
  },
  navigationView: {
    flexDirection: "row",
    justifyContent: "space-between",
    alignItems: "center",
    width: "100%",
  },
  navigationBtn: {
    backgroundColor: "#A838D7",
    height: 40,
    width: 80,
    justifyContent:"center",
    alignItems:"center"
  },
  navigationBtnTxt: {
    color: "white",
    fontWeight: "bold"
  }

});
Final Result
That was it for this article, I hope you find it as informative as you have expected.
I will be adding this repository to github and expo.io, feel free to use it however you like.
If you have any questions, you can contact me or comment your concerns below.
Stay safe and happy coding.
Excelent, thank you
Thank you Daniel, Glad you enjoyed reading my article 😉
Where have you saved the new state file? and how we can make the Splash Screen file as a class?
Please help!