Table of Contents
Hello everyone, and welcome into my new article React Native Drawer Tutorial.
In this article we are going to explore a a piece of the React Native Navigation ecosystem, The Drawer Navigation.
The Drawer Navigation is one of the fundamental ways of navigation between screens in Mobile Apps.
And it is native to bot platforms Ios and Android, and recently, You can see plenty of web apps adopt this approach too.
React Native Drawer Concept
The concept behind the Drawer Navigation is pretty simple.
On the header of your screens, you will have an icon button on your top left screen.
Usually represented with 3 horizontal lines, and when the users presses on it, a navigation drawer will show up from Left of the screen.
It will contain a list of main screens user can navigate to, such as Home screen, Settings etc.
UI Concept
So to achieve a seemingness Drawer navigation, we will try to build an app with 3 different screen.
Each screen will have a header, an Image and 2 paragraph text.
The header will contain 2 (Sometimes 3) components.
On the left the drawer navigation Icon Button.
In the middle, The name of the screen to be represented to the user.
And on the right, I will add an empty text as a placeholder, but notice, most apps will have another Icon button here.
For extra functionality, like sharing on social media etc
And Our sidebar menu, Which is the list of Screens the user can navigate to.
We will have 2 components an icon or Image to represent the meaning of the screen, and its name
And some general user profile data like profile photo, name and email.
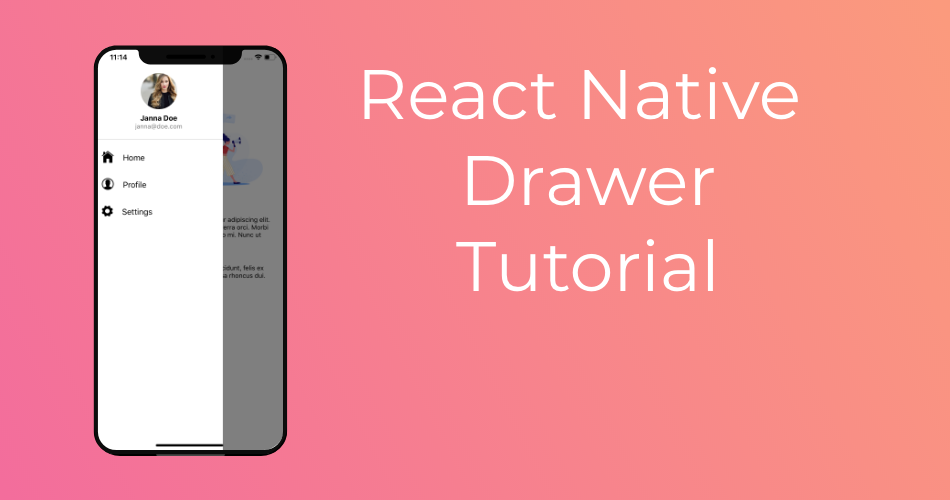
In general the app will look like this.


Let’s Get Started
Environment Setup
To Achieve the given results we will need to install few things.
First the React Navigation library itself react-navigation
yarn add react-navigationThe 2 of it’s helper dependencies
react-native-reanimated
react-native-gesture-handler
yarn add react-native-reanimated react-native-gesture-handlerThen, we will need to install One of the main React Navigation navigators to handle the navigation workflow
react-navigation-stack
react-navigation-drawer
There are more than these 2, but for this example we will only need these.
So go ahead and install them into your project.
yarn add react-navigation-stack react-navigation-drawerOne last library we will need is the @expo/vector-icons, which will allow us to use tons if icons, pre-made and fully customized in our app.
yarn add @expo/vector-iconsSetting Up The Drawer Navigation
To navigate between screens in your app you will need to make an app container using createAppContainer.
Then add to it the Stack navigator including all your stacks, for our example we will only add one.
Which is the Drawer Navigator we have, you might have more than one.
And finally the Drawer navigator itself with the list of Screens you want the user to transit from and to.
Let’s start with the Drawer Navigator first.
Create Drawer Navigator
Import the createDrawerNavigator from react-navigation-drawer
import { createDrawerNavigator } from 'react-navigation-drawer';Then make use it to create a new drawer navigator with the below properties.
const Drawer = createDrawerNavigator(
  {
    Home:{ screen: Home},
    Profile:{ screen: Profile},
    Settings:{ screen: Settings}

  },
  {
    initialRouteName: "Home",
    unmountInactiveRoutes: true,
    headerMode: "none",
    contentComponent: props => <Sidebar {...props} />
  }
)
The First argument of the createDrawerNavigator function is an object with all the screens you want your user to navigate.
You have to import them First, these are React components.
In my case, I will just add simple functional components within the same App.js file.
The second argument is also an object where you can add the navigation options you want.
For this example I got 4.
initialRouteName, it’s name is descriptive, the default Screen your want your user to land to from this Navigator.
I am having it default into the Home Screen.
unmountInactiveRoutes, it’s an advanced feature recently added to react Native, which saved us hell of coding.
Simply it destroys every screen you leave.
Without this feature, back when react native first came, every time you switch from a screen into another, then get back to that screen.
You will notice, that it wasn’t destroyed, and it’s still live in the background. and also still has it’s state and props.
So it will not get new ones, and you had to handle this manually
headerMode, This property, removes the default header space, the navigators have, so that you can implement your own.
Or in case you want to have a full screen component.
contentComponent, This property takes care of our sidebar list menu. So make one and import it and add it here.
Create Stack Navigator
Now let’s Create Stack Navigator, similar to the Drawer navigator, nothing extra.
But we will only add the initial route name for the navigation options.
And of course add the Drawer Navigator we created earlier to this stack navigator.
As I have mentioned before in this article and In my previous article React Native Screen Transitions.
You can have multiple Stack navigators in your app, in fact, you probably need to split your screens into stacks.
And use them accordingly.
An example of multiple stack navigators, would be splitting your app screens into categories and on the same level.
Is to have A User Authentication stack and a main drawer navigation stack or other navigation stacks, such us Bottom Tab Navigation, with your screens.
You can also split the main into functional screens stack and settings screens stack
const AppNavigator = createStackNavigator(
  {
    Drawer : {screen: Drawer},
  },
  {
    initialRouteName: "Drawer",
  }
)
Create App Container
Create an app navigation container from the AppNavigator navigation stack like this.
const AppContainer = createAppContainer(AppNavigator);And finally render the AppContainer in your App.js render method
class App extends React.Component {
  render(){

    return (
      <AppContainer />
    );
  }

}
React Native With Redux Integration
If you are using your React Native With Redux in your project the implementation will differ a bit for the latest step.
After you create your app navigation container.
you have t include it within the redux provider within the render method of the App.js
To achieve this, simply import Provider from Redux from react-redux And Your store and add it like this.
class App extends React.Component {

  render(){
    return (
      <Provider store={store}>
          <AppContainer />
      </Provider>    )
  }
}
Create Drawer Sidebar
Now, let’s create the Sidebar for our navigation Drawer.
Remember that it’s just a react Component, and you can make it look anything you want.
But in general you would want to have a list of screens the user can navigate to each with a name and an icon.
Maybe add more user details, like an avatar, name and email, and some extra links, for FAQ or Feedback submissions etc.
For Simplicity, I am going to add only include the screens list, and user profile data, such us photo, name and email.
This is the drawer sidebar result

So, let’s make a new React Native Component called Sidebar and add an initial state with Routes.
  state = {
      routes:[
          {
              name:"Home",
              icon:"ios-home"
          },
          {
              name:"Profile",
              icon:"ios-contact"
          },
          {
              name:"Settings",
              icon:"ios-settings"
          },
      ]
  }
As you might have noticed each Route has a name and an icon.
The name is pretty obvious, the name of the screen to navigate to.
And the icon name the Ionicons icon names from @expo/vector-icons
For this article I only used Ionicons, but you can use icons from different providers.
If you want to check the full icons list, you can check Expo Icons
Profile Data
For our sidebar top side, we wanted to add general user profile data to the sidebar.
The first part is simple a round image and a 2 texts for the name and email.
<Image source={require("./assets/profile.jpg")} style={styles.profileImg}/>
<Text style={{fontWeight:"bold",fontSize:16,marginTop:10}}>Janna Doe</Text>
<Text style={{color:"gray",marginBottom:10}}>janna@doe.com</Text>
Style
  profileImg:{
    width:80,
    height:80,
    borderRadius:40,
    marginTop:20
  }
And the to add a sidebar divider line like you see in the picture.
Simply add an empty View component, and style it like this
<View style={styles.sidebarDivider}></View>
  sidebarDivider:{
    height:1,
    width:"100%",
    backgroundColor:"lightgray",
    marginVertical:10
  }
marginVertical & marginHorizontal
You might have noticed this uncommon styling property in react native.
It’s used to have linear margin.
Instead of having top and bottom margins or left and right.
You can have it on one single property.
Vertical for top and bottom, and horizontal for left and right.
You can also use it for padding.
paddingVertical & paddingHorizontal
Sidebar Screen routes
To fill our sidebar with route, we are going to use react native flatlist.
If you do not know how it works, or make one, check my old tutorial React Native Flatlist Example.
Import the React Native FlatList and add it below our Sidebar divider
  <FlatList
      style={{width:"100%",marginLeft:30}}
      data={this.state.routes}
      renderItem={({ item }) => <Item  item={item} navigate={this.props.navigation.navigate}/>}
      keyExtractor={item => item.name}
  />
Notice, the navigate function we are passing from the Sidebart component to the item.
We are going to use it to navigate to screens, using the name property from the state.
And the flatlist renderItem function
function Item({ item, navigate }) {
  return (
    <TouchableOpacity style={styles.listItem} onPress={()=>navigate(item.name)}>
      <Ionicons name={item.icon} size={32} />
      <Text style={styles.title}>{item.name}</Text>
    </TouchableOpacity>
  );
}
Styles
  listItem:{
      height:60,
      alignItems:"center",
      flexDirection:"row",
  },
  title:{
      fontSize:18,
      marginLeft:20
  },
As you might have noticed, you have added on each item a TouchableOpacity button with name and Icon for every screen.
Using icon name and screen name from each item.
And this is the final result

App Screens
The last piece we need for our app to work are screens we want to navigate to and from.
We haven’t created them yet, so let’s go for it.
For simplicity, I have included them within the App.js file, since they are pretty simple.
But you might need to have them on a different folder, to keep your app well organized.
Each screen will have a Header component, we haven’t created it yet, an Image and a couple of text paragraphs.
Like this
const Home = ({navigation}) => (
  <View style={styles.container}>
    <Header name="Home" openDrawer={navigation.openDrawer}/>
    <Image source ={require("./assets/banner.png")} style={{width:"80%", height:"30%"}} resizeMode="contain"/>
    <Text style={{padding:20}}>
    Lorem ipsum dolor sit amet, consectetur adipiscing elit. Aliquam sit amet dictum sapien, nec viverra orci. Morbi sed maximus purus. Phasellus quis justo mi. Nunc ut tellus lectus.
    </Text>
    <Text style={{padding:20}}>
    In eleifend, turpis sit amet suscipit tincidunt, felis ex tempor tellus, at commodo nunc massa rhoncus dui. Vestibulum at malesuada elit.
    </Text>

  </View>
)
Notice, for the Header component, we are passing 2 props.
Name, The name of the screen we want to be displayed on the header.
openDrawer(), a function the react native navigation passes to every screen you have on your app navigator container.
The react Native Navigation does not have just that utility, it has dozens of navigation tools you can use to handle the navigation of your app.
As an example from our flatlist, we are using the navigate() to navigate into a screen using its name.
Another one, is the goBack() function. And we use it to navigate to teh previous screen we came from.
openDrawer() opens the drawer and brings up the sidebar we have created.
it’s already passed to our props on all screens within the Drawer navigator.
So you just use it like this. this.props.navigation.openDrawer().
Now our Home screen looks like this

Go on and create multiple screens to use in your app, for this article I have 3 Home, Profile, and Settings. With the same content.
Screen Header
Finally let’s make the Header Component we have on each screen, to display the name of every screen, and an icon button to open the drawer.
const Header =({name, openDrawer})=> (
  <View style={styles.header}>
    <TouchableOpacity onPress={()=>openDrawer()}>
      <Ionicons name="ios-menu" size={32} />
    </TouchableOpacity>
    <Text>{name}</Text>
    <Text style={{width:50}}></Text>
  </View>
)
Style
  header:{
    width:"100%",
    height:60,
    flexDirection:"row",
    justifyContent:"space-between",
    alignItems:"center",
    paddingHorizontal:20
  }
And there you have it, a simple React Native Drawer Tutorial, to make a clean drawer navigation through your app.
I will create a Github and Expo.io repositories you can use to test and implement for your projects.
This Article and the repositories will keep updating on new stuff, and explore anything updated for the Drawer navigation, to keep it ready for future patches.
I hope you enjoyed my article and found it as informative as you have expected.
Thank you for your time, take care.
Happy Coding
Thanks Sir, Very helpful your articles. keep updating more articles like this on react native
Thank you so much, I really appreciate your support, I am no where to stop adding articles, stay tuned for more.
This is great. Thank you
I really need your help and guide on how to do a role-based login app with different user levels using RN.
Let’s say we have users
1. Cashier,
2. Admin and
3. Customer
Each user will have a dashboard and navigation menu (drawer) specific to it.
when you login as Manager it takes you to Manager’s dashboard with Manager’s specific Drawer menu
when you login as Cashier it takes you to Cashier’s dashboard with Cashier’s specific Drawer menu
when you login as Customer it takes you to Customer’s dashboard with Customer’s specific Drawer menu
I am using a nodejs API on my local server as backend.
I just need a basic example on how to do this and how to structure my folder.
Hi Russell, Thanks for reaching out to me. I think I can help you with your concern.
I think the simplest way you can achieve that is by have dashboards and Header Drawer role specific using the routes in the state.
You can have it predefined per role, or fill it based on the user role when the drawer is mounted.
I have worked on a similar functionality for an app before. and this how I had it done.
Thank you Youssef for your prompt response and genuine concern.
I just started with react native, and I was hoping you do a tutorial on this, particularly on how to structure folder for components/pages specific to each user role. Because I really need this as a project for a job. Is there a github or tutorial link you can recommend. Nonetheless, what you suggested in your reply is very well appreciated and useful still.
You are doing a fantastic job, and I couldn’t believe my eyes on the quality and straight-to-the-point content you’ve got here.
Hello again Russel, It’s really pleasant to hear from you again.
Thank you a lot for your kind message, I am flattered, and appreciate your support.
Concerning the folder structure, there is not much of a one way solution for this. I think every developer has his own way of structuring his projects. I would suggest you find your own based on your programming experience.
For me I usually split my react native projects into screens folder, and smaller components folder when I get started and build my way from there.
When it comes to react native there is one particular book I would recommend, it has it all and fully detailed. it’s fullstack react native.
if you still need help or want to discuss something, join me on facebook https://www.facebook.com/ReactNativeMaster
Sir, Please add some article on firebase that how can we perform authentication and all that.
You can help me show source code in gitgub ? Thank sir. I’m from VietNam
Hi Sir,
The Github source code is already mentioned in the article.
is that valid for react-navigation 5.0 ? it does not work for me
I think it will, if not the changes would be minor, check the new react-navigation docs to make sure.
Still the concept is the same.
Hey Yousseff, this is a great tutorial – thanks for sharing!
Have you considered updating this to show how to create a custom drawer with the new v5 of React Navigation?
Hi David, thank you so much for your feedback, I haven’t been available much lately, you know with corona and everything going on, I will update the article for sure.
Great work, I really like your article.
Question about the library selection: why did you used react-navigation and react-navigation-drawer instead of @react-navigation/native and @react-navigation/drawer?
thanks
hello youssef thank you for your article was really helpful for me and easy to understand keep up
i want ask you if i want use screens outside from the app.js how i do that im still new to react and expo and your article save me
Hi Hakim, thank you for reading my reading my articles.
I am not sure what you mean exactly, what are you trying to achieve ?
thank you for reply
i meant instead of using those three screens that you create (home,profile,settings) in app.js i want to use another screens that i create while evrey screen on different page exemple(home.js,map.js,…) and all those i put it on a folder call screens but i couldn’t connect them with drawer can you help me and thank you
Yes, you can use the same approach,
Import the screens then add it to the drawer object.
Then add it to the sidebar
Thanks for the tutorial. I get the following error:
Unable to resolve “@react-native-community/masked-view” from “node_modules/react-navigation-stack/lib/module/vendor/views/MaskedView.native.js”
Thank you very much, you helped me a lot. I am Brazilian and there are no tutorials as well written in Portuguese as yours in English. Valeu cupadi, tamo junto !!!
Heya thank you!! very great help.
Just one thing: on Android the drawer is not closing pressing outside…
How can I solve this?