Table of Contents
Hello everyone, and welcome into this new article where we are going to explore how to use React Native Share.
In this article we will consume the Share API from React Native, to share a feed post from your app to any social media.
To Achieve this I will create a simple social media app feed card with a post content of an image, title, body text and share button.
Something similar to most social media or blog apps posts out there.
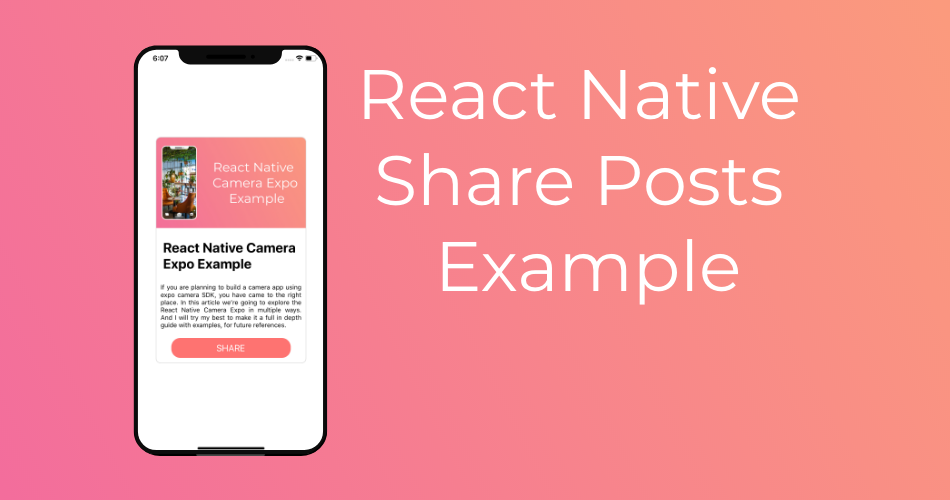
The final result will look like this.

And once you click on the share button, the app will launch the default native Share dialog of IOS and Android.
With the default apps the user have installed in his device that accepts content.

The screenshot is taken from an emulator, expect way more apps and content in the dialog when you try it.
The emulator does not have much apps installed in it, so we are left with fewer options.
Let’s Get Started
As I have mentioned before, the app will mimic a blog post.
With an image thumbnail, a title, a body text and a share button.
Once the share button is clicked we will send to social media app the title, body and Post Url.
Blog Post UI
Let’s create UI first.
it’s pretty simple though nothing complex or library based to install.
Just Text, Image and Button (TouchableOpacity).
The render method will look like this.
<View style={styles.container}>
        <View style={styles.card}>
          <Image style={styles.thumb}  source={{uri:"https://reactnativemaster.com/wp-content/uploads/2019/11/Featured-Image.jpg"}}/>
          <Text style={styles.h1}>React Native Camera Expo Example</Text>
          <Text style={styles.body}>
          If you are planning to build a camera app using expo camera SDK, you have came to the right place.
          In this article we’re going to explore the React Native Camera Expo in multiple ways.
          And I will try my best to make it a full in depth guide with examples, for future references.
          </Text>
          <TouchableOpacity style={styles.shareBtn} onPress={()=>this.Share()}>
            <Text style={styles.shareTxt}>SHARE</Text>
          </TouchableOpacity>

        </View>
      </View>
And the styles
const styles = StyleSheet.create({
  container: {
    flex: 1,
    backgroundColor: '#fff',
    alignItems: 'center',
    justifyContent: 'center',
  },
  card:{
    width:"80%",
    borderRadius:10,
    borderColor:"lightgray",
    borderWidth:1,
    justifyContent:"center",
    alignItems: 'center',

  },
  h1:{
    fontWeight:"bold",
    fontSize:30,
    color:"#000",
    margin:15,
  },
  body:{
    color:"#000",
    paddingHorizontal:10,
    textAlign:"justify",
    padding:10

  },
  thumb:{
    width:"100%",
    height:200,
    marginBottom:10,
    borderTopStartRadius:10,
    borderTopEndRadius:10
  },
  shareBtn:{
    margin:10,
    backgroundColor:"#FE7371",
    padding:10,
    width:"80%",
    borderRadius:20,
  },
  shareTxt:{
    fontSize:20,
    color:"#fff",
    alignSelf:"center"
  }
});
Sharing Function
To use the share API Import it from react native library.
The Share Api has a function share that takes 2 arguments, content and options
Content
message– a message to sharetitle– title of the message
iOS
url– an URL to share
At least one of URL and message is required.
Options
iOS
subject– a subject to share via emailexcludedActivityTypestintColor
Android
dialogTitle
Let’s now create the function and explore it.
  Share = async () => {
    try {
      const result = await Share.share({
        message:`
        If you are planning to build a camera app using expo camera SDK, you have came to the right place.
        In this article we’re going to explore the React Native Camera Expo in multiple ways.
        And I will try my best to make it a full in depth guide with examples, for future references.`,
        title:"React Native Camera Expo Example",
        url:"https://reactnativemaster.com/react-native-camera-expo-example/"
      });

      if (result.action === Share.sharedAction) {
        alert("Post Shared")
      } else if (result.action === Share.dismissedAction) {
        // dismissed
        alert("Post cancelled")
      }
    } catch (error) {
      alert(error.message);
    }
  };
As you might have notice, we are providing the share function with a title, a message for post body and a url.
The result of this action has plenty of feedback based on user interactions.
Such as if the sharing was successful, or cancelled.
But we are not providing any options, these are mostly app specific, such as emails, that need the email etc.
We might get into it later and send emails with it.
Now the app is fully functioning.
I hope you liked this article, and find it as informative as you have expected.
I will make a github repository and expo.io project, incase you wanted to work on it.
Feel free to comment out your questions, don’t hesitate.
Happy coding.
I just want that share button to share the post image along with the text and URL of the post on which I can click on a redirect in-app to view the post.