Table of Contents
If you are planning to build a camera app using expo camera SDK, you have came to the right place.
In this article we’re going to explore the React Native Camera Expo in multiple ways.
And I will try my best to make it a full in depth guide with examples, for future references.
Creating a new React native expo project
To get started,
Create a new expo react native project. And if you are confident to try it on your current projects.
It wont differ.
If you took the First option and run the project,
you will be presented by the default React native expo screen below.

Next Let’s install the Expo Camera SDK and Expo Permissions using expo Cli
expo install expo-camera
expo install expo-permissions
Now We are ready to Go.
Camera UI Concept
To make our Camera app look a bit interesting, I will try to make it good looking. So I am going to aim for the default Samsung galaxy Camera app, with simple UI. Working in 4 Main components.
To achieve this I am going to split the screen into 2 parts
The Camera View, and The interaction buttons including, a button for taking a picture.
switching from Rear camera to Front camera and vise Versa.
and a button to bring up the camera roll to check the pictures taken.
Let’s Get Started
To access camera in react native you need to import the expo-camera SDK, and Camera permissions from expo-permissions.
Before we can display the camera, or interact with it in any ways.
The app must ask user permission usage for the camera.
Then we can create UI with either the camera show, or a text message asking for the permissions.
the app must ask user permission usage for the camera.
Then we can create UI with either the camera show, or a text message asking for the permissions.
import { Camera } from 'expo-camera';
import * as Permissions from 'expo-permissions';
The best place to ask for user permissions is inside the componentDidMount lifecycle method.
Let’s add that next and save the user permission on state to use it later
In addition to the users’ permission in the state,
lets add a property to hold the camera type to control the type of camera that’s being used (Rear or Front)
  state = {
    hasPermission: null,
    type: Camera.Constants.Type.back,
  }

  async componentDidMount() {
    const { status } = await Permissions.askAsync(Permissions.CAMERA);
    this.setState({ hasPermission: status === 'granted' });
  }
This is the message the user will see, once he lands on the Camera screen.

Let’s head the the render method and add the Camera display logic.
  render(){
    const { hasPermission } = this.state
    if (hasPermission === null) {
      return <View />;
    } else if (hasPermission === false) {
      return <Text>No access to camera</Text>;
    } else {
      return (
          <View style={{ flex: 1 }}>
            <Camera style={{ flex: 1 }} type={this.state.cameraType}>

            </Camera>
        </View>
      );
    }
  }

}
This part simply means, when the camera view will be shown to the user based on his permission.
If the app has the permission,
the Camera will be shown, if not a text message asking for permission, and if the property is null.
it will display an empty view, this usually happens at the start of the app while the componentDidMount is not yet called.
and this is what the app looks like so far like this. and the Camera View Takes the full screen

Add Camera UI
The Camera UI Interaction buttons we will be using, will compose of a TouchableOpacity component, and an Expo Icons component
The app will have 3 buttons each with a different Icon representing an action, and they are.
Taking a photo, Switching between Cameras Types (Rear and Front) and displaying the All the photos taken by this camera.
To Achieve this, let’s add a view inside the Camera components, which will contain the 3 Icon Buttons.
You can explore the entire list of Icons Provided by default by Expo here
To use any Icon, all you need is to match its name and Its Type.
And Add it to the Touchable.
First import the Type of Icons you want to use, as an example Font Awesome
import { FontAwesome } from '@expo/vector-icons';And use it like this
<FontAwesome name="camera" />You can add styles to it, and transform it as you like.
you will most likely need to either change its color and its side using these 2 properties
you will most likely need to either change its color and its side using these 2 properties
<FontAwesome
  name="camera"
  style={{ color: "#fff", fontSize: 40}}
/>
Now we are Good to add it all together.
I will be using 3 icons from 3 different types FontAwesome, Ionicons and MaterialCommunityIcons, so let’s start by importing them
import { FontAwesome, Ionicons,MaterialCommunityIcons } from '@expo/vector-icons';
Like we have planned, let’s add a root view inside the camera components to hold the interactions buttons.
<View style={{flex:1, flexDirection:"row",justifyContent:"space-between",margin:20}}>
  <TouchableOpacity
    style={{
      alignSelf: 'flex-end',
      alignItems: 'center',
      backgroundColor: 'transparent',
    }}>
    <Ionicons
        name="ios-photos"
        style={{ color: "#fff", fontSize: 40}}
    />
  </TouchableOpacity>
  <TouchableOpacity
    style={{
      alignSelf: 'flex-end',
      alignItems: 'center',
      backgroundColor: 'transparent',
    }}>
    <FontAwesome
        name="camera"
        style={{ color: "#fff", fontSize: 40}}
    />
  </TouchableOpacity>
  <TouchableOpacity
    style={{
      alignSelf: 'flex-end',
      alignItems: 'center',
      backgroundColor: 'transparent',
    }}>
    <MaterialCommunityIcons
        name="camera-switch"
        style={{ color: "#fff", fontSize: 40}}
    />
  </TouchableOpacity>
</View>
I have added a root view style to put it down the screen instead of top.
And added a justifyContent property of value Space Between to split the buttons across the width of the device.
and each buttons has its style to handle the icon inside it.
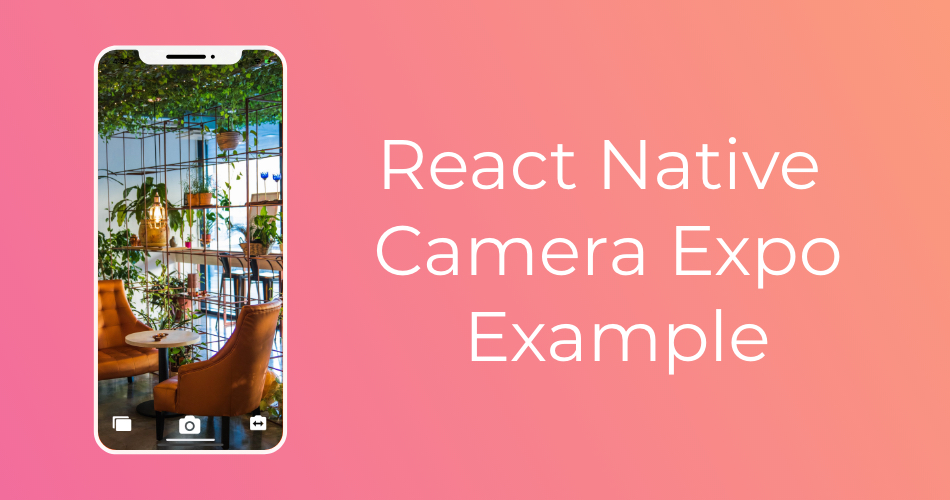
So fare the app looks like this.

Camera UI interactions
Change Expo Camera Type
Switching between camera Type is straight forward.
all you need to do is handle the type prop in the camera component.
And if you remember we have already setup in the state.
And if you remember we have already setup in the state.
and if you remember we have already setup in the state.
So let’s create a function to handle it.
  handleCameraType=()=>{
    const { cameraType } = this.state

    this.setState({cameraType:
      cameraType === Camera.Constants.Type.back
      ? Camera.Constants.Type.front
      : Camera.Constants.Type.back
    })
  }
The function above checks wether the camera View is using the back camera, if so it changes it into the front one.
if not it sets it to the back camera.
No add this function to the onPress props on the touchable and you are set.
<TouchableOpacity
  style={{
    alignSelf: 'flex-end',
    alignItems: 'center',
    backgroundColor: 'transparent',
  }}
  onPress={()=>this.handleCameraType()}
  >
  <MaterialCommunityIcons
      name="camera-switch"
      style={{ color: "#fff", fontSize: 40}}
  />
</TouchableOpacity>
Take Pictures using the Expo Camera
To take a picture, the Expo Camera has a function called takePictureAsync.
And to use to expose a camera component reference, And since this setup is straight forward.
Just add following prop to the camera component and you are set
  ref={ref => {
    this.camera = ref;
  }}
Next, make function to make use the the camera ref and it’s takePictureAsync function.
takePicture = async () => {
  if (this.camera) {
    let photo = await this.camera.takePictureAsync();
  }
}
Now, the photo variable stores information about the taken photo, it’s an object with these proprieties.
URI: The full path to the taken photo file in the device, where its stored
Height: The height of the photo
Width: The width of the photo
base64: if you set the base64 parameter in the takePictureAsync function, it will retrieve JPEG data for the image.
exif: if you set the exif parameter in the takePictureAsync function, it will retrieve EXIF data for the image.
Access Stored Photos using React native CameraRoll
To access the photos we have taken using the camera, we can use the Expo ImagePicker Component,
The expo ImagePicker is a component layer on top of native IOS and Android file picker UI system.
For selecting Images without the need to write code from scratch, it’s pretty handy and easy to use.
Install it first, then import it
expo install expo-image-pickerimport * as ImagePicker from 'expo-image-picker';Again, we will need permissions to access the camera roll of the device, but this time only for IOS devices.
And not for Android.
Let’s make a function for permissions, and include both camera permissions and Camera roll permissions at once.
Then Add to to componentWillMount Method.
async componentDidMount() {
  this.getPermissionAsync()
}
getPermissionAsync = async () => {
    // Camera roll Permission
    if (Platform.OS === 'ios') {
      const { status } = await Permissions.askAsync(Permissions.CAMERA_ROLL);
      if (status !== 'granted') {
        alert('Sorry, we need camera roll permissions to make this work!');
      }
    }
    // Camera Permission
    const { status } = await Permissions.askAsync(Permissions.CAMERA);
    this.setState({ hasPermission: status === 'granted' });
  }
All good, once the app is opened, it will ask for both Camera and CameraRoll permissions. And do not forget to import the Platform module from React Native

Now, let’s write the a function, to handle the camera roll image list.
And add it to the display photo’s button
  pickImage = async () => {
    let result = await ImagePicker.launchImageLibraryAsync({
      mediaTypes: ImagePicker.MediaTypeOptions.Images,
    });
  }
Once the user invokes this function, this screen will display showing the default device’s gallery app.
where they can check their photos.

I have created a github repository for this project, you can access it from here. I will probably improve it a bit later on.
And if you guys request features or UI changes It will be added for sure.
I think that was it for this tutorial.
We have built a fully functioning camera app using React Native Camera Expo There are more options we can explore.
like adding more functionality to the camera, such as zooming, adding focus, and the ability to toggle flash.
You can add more on your project for sure.
Thank you for this example. I have a question, how can it be implemented in vue native?
Hi Sebastian,
I am not sure about Vue Native, but I will guess the process will be similar.
Thank you for this example