Table of Contents
Hello everyone, in this Article we will try to explore how to make React Native Screen Transitions, In the simplest way possible. Yet good looking.
App UI Concept
To establish a good knowledge base on how to make React Native Transitions, I will try to make a starter and a login screens.
This is the starting point of most new modern apps.
Before you login, you usually get into a starting screen where you get a tiny description text and a call to action button.
Once clicked, you have the screen transitions into 2 or 3 screens, then you get into the login or sign up screens.
Something similar to this one.

Getting started
To get started as usual create a new project using Expo or React Native Cli.
With both approaches, you will usually get a starting code like this.

import React from 'react';
import { StyleSheet, Text, View } from 'react-native';

export default class App extends React.Component {
  render(){
    return (
      <View style={styles.container}>
        <Text>Open up App.js to start working on your app!</Text>
      </View>
    );
  }
}

const styles = StyleSheet.create({
  container: {
    flex: 1,
    backgroundColor: '#fff',
    alignItems: 'center',
    justifyContent: 'center',
  },
});
Environment Setup
To make a React Native Screen Transitions, we need to use the React Native Navigation.
It’s pretty similar to using the React Router on Reactjs projects.
For React native, we will need to install few more libraries provided by Facebook.
The first step is to install React Navigation in your project:
npm install --save react-navigationThe second step is to install react-native-gesture-handler
npm install --save react-native-gesture-handlerThe third step is to install react-navigation-stack
npm install --save react-navigation-stackNavigator Setup
We get started by creating an App Container, to manage the entire navigations.
Then inside it we setup what we refer to as stack navigations, which by itself holds the screens we want to transit from and to.
As an example, an app can have an app container with an Authentication stack including login and signup screens.
And, On the same level another Main stack including the feed, profile and settings screens and so on.
For simplicity, we will have one container and one stack with 2 screens, Hone and Login.
To achieve this, out code inside App.js will look like this.
Notice, I set the stack navigation to not how the header, you can see it in the code.
import {createAppContainer} from 'react-navigation';
import {createStackNavigator} from 'react-navigation-stack';

import Login from "./src/components/Login"
import Home from "./src/components/Home"

const MainNavigator = createStackNavigator({
  Home: {screen: Home},
  Login: {screen: Login},

},
{
  headerMode: 'none',
  navigationOptions: {
      headerVisible: false,
  }
});

const App = createAppContainer(MainNavigator);

export default App;
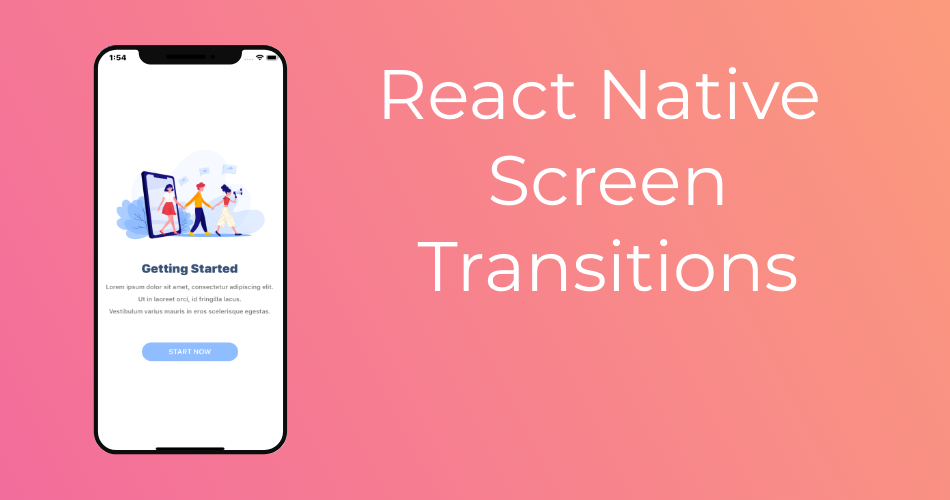
Home Screen
As I have shown you in the UI concept App starter Screen example.
Our Home screen will contain a vector Image, Some texts and a call to action Button.
We start by making a new React Native Component called Home.js.
The render Method will look something like this.
export default function Home() {
  return (
    <View style={styles.container}>
      <Image  source={require("../../assets/banner.png")} style={{width:"80%",height:"30%"}} resizeMode="contain" />
      <Text style={styles.header}>Getting Started</Text>
      <Text style={styles.description}>Lorem ipsum dolor sit amet, consectetur adipiscing elit.</Text>
      <Text style={styles.description}>Ut in laoreet orci, id fringilla lacus.</Text>
      <Text style={styles.description}>Vestibulum varius mauris in eros scelerisque egestas.</Text>
      <TouchableOpacity style={styles.startBtn}>
        <Text style={styles.startText}>START NOW</Text>
      </TouchableOpacity>

    </View>
  );
}
And this is the styles list I have used.
const styles = StyleSheet.create({
  container: {
    flex: 1,
    backgroundColor: '#fff',
    alignItems: 'center',
    justifyContent: 'center',
  },
  header:{
    fontWeight:"bold",
    fontSize:24,
    color:"#375177",
    marginBottom:10
  },
  description:{
    fontSize:12,
    color:"gray",
    padding:5
  },
  startBtn:{
    backgroundColor:"#90bdff",
    borderRadius:50,
    padding:10,
    width:"50%",
    alignItems:"center",
    marginTop:50
  },
  startText:{
    color:"white"
  }
});
Our Home Screen looks like this.

Login Screen
The login Screen will contain:
Login Text, 2 TextInput component for The email and password inputs. And Login TouchableOpacity Button.
After Importing the components you need, the render method will have this code.
Notice the secureTextEntry prop on the TextInput component is to hide the password
export default function Login() {
  return (
    <View style={styles.container}>
      <Text style={styles.header}>LOGIN</Text>
      <TextInput style={styles.input} placeholder="Email..." />
      <TextInput style={styles.input} placeholder="Password..." secureTextEntry />
      <TouchableOpacity style={styles.startBtn}>
        <Text style={styles.startText}>LOGIN</Text>
      </TouchableOpacity>

    </View>
  );
}
And the styles
const styles = StyleSheet.create({
  container: {
    flex: 1,
    backgroundColor: '#fff',
    alignItems: 'center',
    justifyContent: 'center',
  },
  header:{
    fontWeight:"bold",
    fontSize:30,
    color:"#375177",
    marginBottom:20
  },
  input:{
    borderWidth:1,
    borderColor:"#375177",
    borderRadius:50,
    width:"80%",
    height:40,
    marginBottom:20,
    padding:10
  },
  startBtn:{
    backgroundColor:"#90bdff",
    borderRadius:50,
    padding:10,
    width:"50%",
    alignItems:"center",
    marginTop:50
  },
  startText:{
    color:"white"
  }
});
The screen looks like this.

Navigating Between Screens
To navigate between screens in react Native, we use the navigate function from The navigation props.
By default our screens will have a prop called Navigation, which have plenty of navigation methods and tools we can use.
As an example the GoBack function, which we use to navigate from a screen the the previous one.
And to navigate from a screen to another we use the function called Navigate.
To use it it’s pretty straight forward.
if you are using a function component like I am add the props parameter to the component.
then access the prop directly
if you are using a container component you wont need do anything
To access the props you use this.props
To navigate from the Home screen we add the navigation functionality to onPress props of the Start now button.
      <TouchableOpacity style={styles.startBtn} onPress={()=>props.navigation.navigate("Login")}>
        <Text style={styles.startText}>START NOW</Text>
      </TouchableOpacity>
Notice the parameter of the navigation function, is the name of the screen we want to navigate to.
Go Back To Previous Screen
If you want to implement a back button press To go back to previous screen in react native, you can implement the react router as well.
By using goBack() prop.
props.navigation.goBack()And you can add it on whatever screen you want.
There you have it, React native Screen Transitions simple and elegant.
I have prepared both a github project and an Expo.io if you would like to work on the project or test it.
Recommended Articles
React Native Countdown Timer Example Using MomentJs
React Native Camera Expo Example
React Native Accessibilityinfo API
React Native Flatlist Example
Thank you sir