Table of Contents
Good afternoon everyone, welcome to my new article, where we are going to explore the React Native accessibilityinfo API.
Accessibilityinfo is an API provided by React Native to help you get the the current various statuses of the user device for both android and IOS. And track it as they change.
Currently the Accessibilityinfo supports tracking the BoldText, Grayscale, InvertedColors, ReduceTransparency and ScreenReader.
This article is rather an informative one than an example, so we will explore the Accessibilityinfo API in a short example.
Let’s Get Started
lets get started, just prepare a new project or follow just along with me, it wont differ.
Once you are on a new react native project, you would be presented with the next starter screen and code

import React from 'react';
import { StyleSheet, Text, View } from 'react-native';

export default class App extends React.Component {
  render(){
    return (
      <View style={styles.container}>
        <Text>Open up App.js to start working on your app!</Text>
      </View>
    );
  }
}

const styles = StyleSheet.create({
  container: {
    flex: 1,
    backgroundColor: '#fff',
    alignItems: 'center',
    justifyContent: 'center',
  },
});
React Native Accessibiltyinfo Handlers and eventlisteners
The React Native accessibilityInfo API is event based, in order to get the stats.
You have to add an event listener for each stat, and handle the return value.
let’s try to build a screen to display all the states available with minimal UI.
Our initial state will look something like this.
state = {
    reduceMotionEnabled: false,
    screenReaderEnabled: false,
    boldTextEnabled: false,
    grayScaleEnabled: false,
    reduceTransprencyEnabled: false
  };
Let’s add the eventListeners and to our componentDidMount and componentDidUnmount lifecycle methods.
The componentDidMount will get init the accessibilityinfo listeners once the screen launches.
The componentDidUnmount method will clear the listeners before closing the screen.
This is a best practice to keep the app’s performance high.
componentDidMount() {
    AccessibilityInfo.addEventListener(
      'reduceMotionChanged',
      this.handleReduceMotionToggled,
    );
    AccessibilityInfo.addEventListener(
      'screenReaderChanged',
      this.handleScreenReaderToggled,
    );
    AccessibilityInfo.addEventListener(
      'boldTextChanged',
      this.handleBoldTextToggled,
    );
    AccessibilityInfo.handleGrayscaleToggled(
      'grayscaleChanged',
      this.handleGrayscaleToggled,
    );
    AccessibilityInfo.addEventListener(
      'reduceTransparencyChanged',
      this.handleReduceMotionToggled,
    );


    AccessibilityInfo.isReduceMotionEnabled().then((reduceMotionEnabled) => {
      this.setState({reduceMotionEnabled});
    });
    AccessibilityInfo.isScreenReaderEnabled().then((screenReaderEnabled) => {
      this.setState({screenReaderEnabled});
    });
    AccessibilityInfo.isBoldTextEnabled().then((boldTextEnabled) => {
      this.setState({boldTextEnabled});
    });
    AccessibilityInfo.isGrayscaleEnabled().then((grayScaleEnabled) => {
      this.setState({grayScaleEnabled});
    });
    AccessibilityInfo.isReduceTransparencyEnabled().then((reduceTransprencyEnabled) => {
      this.setState({reduceTransprencyEnabled});
    });


  }

 componentWillUnmount(){
    AccessibilityInfo.removeEventListener(
      'reduceMotionChanged',
      this.handleReduceMotionToggled,
    );
    AccessibilityInfo.removeEventListener(
      'screenReaderChanged',
      this.handleScreenReaderToggled,
    );
    AccessibilityInfo.removeEventListener(
      'boldTextChanged',
      this.handleBoldTextToggled,
    );
    AccessibilityInfo.removeEventListener(
      'grayscaleChanged',
      this.handleGrayscaleToggled,
    );
    AccessibilityInfo.removeEventListener(
      'reduceTransparencyChanged',
      this.handleReduceMotionToggled,
    );
  }
componentWillUnmount(){
AccessibilityInfo.removeEventListener(
'reduceMotionChanged',
this.handleReduceMotionToggled,
);
AccessibilityInfo.removeEventListener(
'screenReaderChanged',
this.handleScreenReaderToggled,
);
AccessibilityInfo.removeEventListener(
'boldTextChanged',
this.handleBoldTextToggled,
);
AccessibilityInfo.removeEventListener(
'grayscaleChanged',
this.handleGrayscaleToggled,
);
AccessibilityInfo.removeEventListener(
'reduceTransparencyChanged',
this.handleReduceMotionToggled,
);
}And finally our function handlers for the status
handleReduceMotionToggled = (reduceMotionEnabled) => {
this.setState({reduceMotionEnabled});
};
handleScreenReaderToggled = (screenReaderEnabled) => {
this.setState({screenReaderEnabled});
};
handleBoldTextToggled = (boldTextEnabled) => {
this.setState({boldTextEnabled});
};
handleGrayscaleToggled = (grayScaleEnabled) => {
this.setState({grayScaleEnabled});
};
handleReduceTransparencyToggled = (reduceTransprencyEnabled) => {
this.setState({reduceTransprencyEnabled});
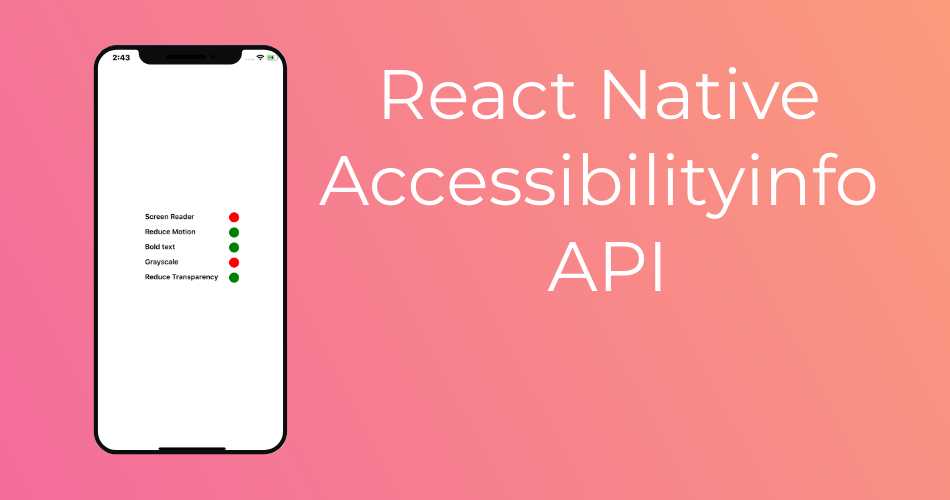
};Accessibilityinfo UI Display
To display the status on our screen I will make a simple text and round circle for each status to show where it’s enabled or disabled.
To achieve this, I will make a view component and add a textView for the name of the status and a blank view.
The blank view is to display green when the status is enabled and red when its disabled.
Using the code below
        <View style={styles.statusView}>
          <Text>Screen Reader</Text>
          <View style={{...styles.status,backgroundColor:this.state.screenReaderEnabled ? "green" : "red"}} />
        </View>
statusView:{
flexDirection:"row",
justifyContent: 'space-between',
width:"50%",
marginBottom:10
},
status:{
height:20,
width:20,
borderRadius:10,
marginLeft:10
}Then we just need to duplicate this view for every status, changing the name and status from the state. Like this.
<View style={styles.container}>
        <View style={styles.statusView}>
          <Text>Screen Reader</Text>
          <View style={{...styles.status,backgroundColor:this.state.screenReaderEnabled ? "green" : "red"}} />
        </View>
        <View style={styles.statusView}>
          <Text>Reduce Motion</Text>
          <View style={{...styles.status,backgroundColor:this.state.reduceMotionEnabled ? "green" : "red"}} />
        </View>
        <View style={styles.statusView}>
          <Text>Bold text</Text>
          <View style={{...styles.status,backgroundColor:this.state.boldTextEnabled ? "green" : "red"}} />
        </View>
        <View style={styles.statusView}>
          <Text>Grayscale</Text>
          <View style={{...styles.status,backgroundColor:this.state.grayScaleEnabled ? "green" : "red"}} />
        </View>
        <View style={styles.statusView}>
          <Text>Reduce Transparency</Text>
          <View style={{...styles.status,backgroundColor:this.state.reduceMotionEnabled ? "green" : "red"}} />
        </View>

      </View>
Changing Accessibilityinfo Status settings
To change the accessibilityinfo status, go to the devices settings, under general settings you can find an Accessibility option.
Here you can update the status as you want. I will turn on the Bold Text, Reduce Motion and Reduce Transparency options.

And our app now looks like this.

Unable to resolve module ‘AccessibilityInfo’
If you run into this problem while you are working with the Accessibilityinfo Api
The solution is simply upgrading your React Native to the latest version, Since this API changes a lot and plenty of updates are upcoming.
Thats it for this article today, I hope you enjoyed it and like what you have been looking for, take care and happy coding.