Table of Contents
Hello everyone, in this new article we are going to explore how we could make a dynamic display of React Native Snackbar.
Introduction
Snackbars in React Native have a very handy usage when it comes to displaying feedback to your users. I am sure most of you have already used it or seen it before within an app.
A famous example would be, Facebook app connection lost or re-connected snackbar.
In our example we will make a quick payment processing app, without payments of course. To mimic The payment process, ether succeeds or fails, using the snackbar.
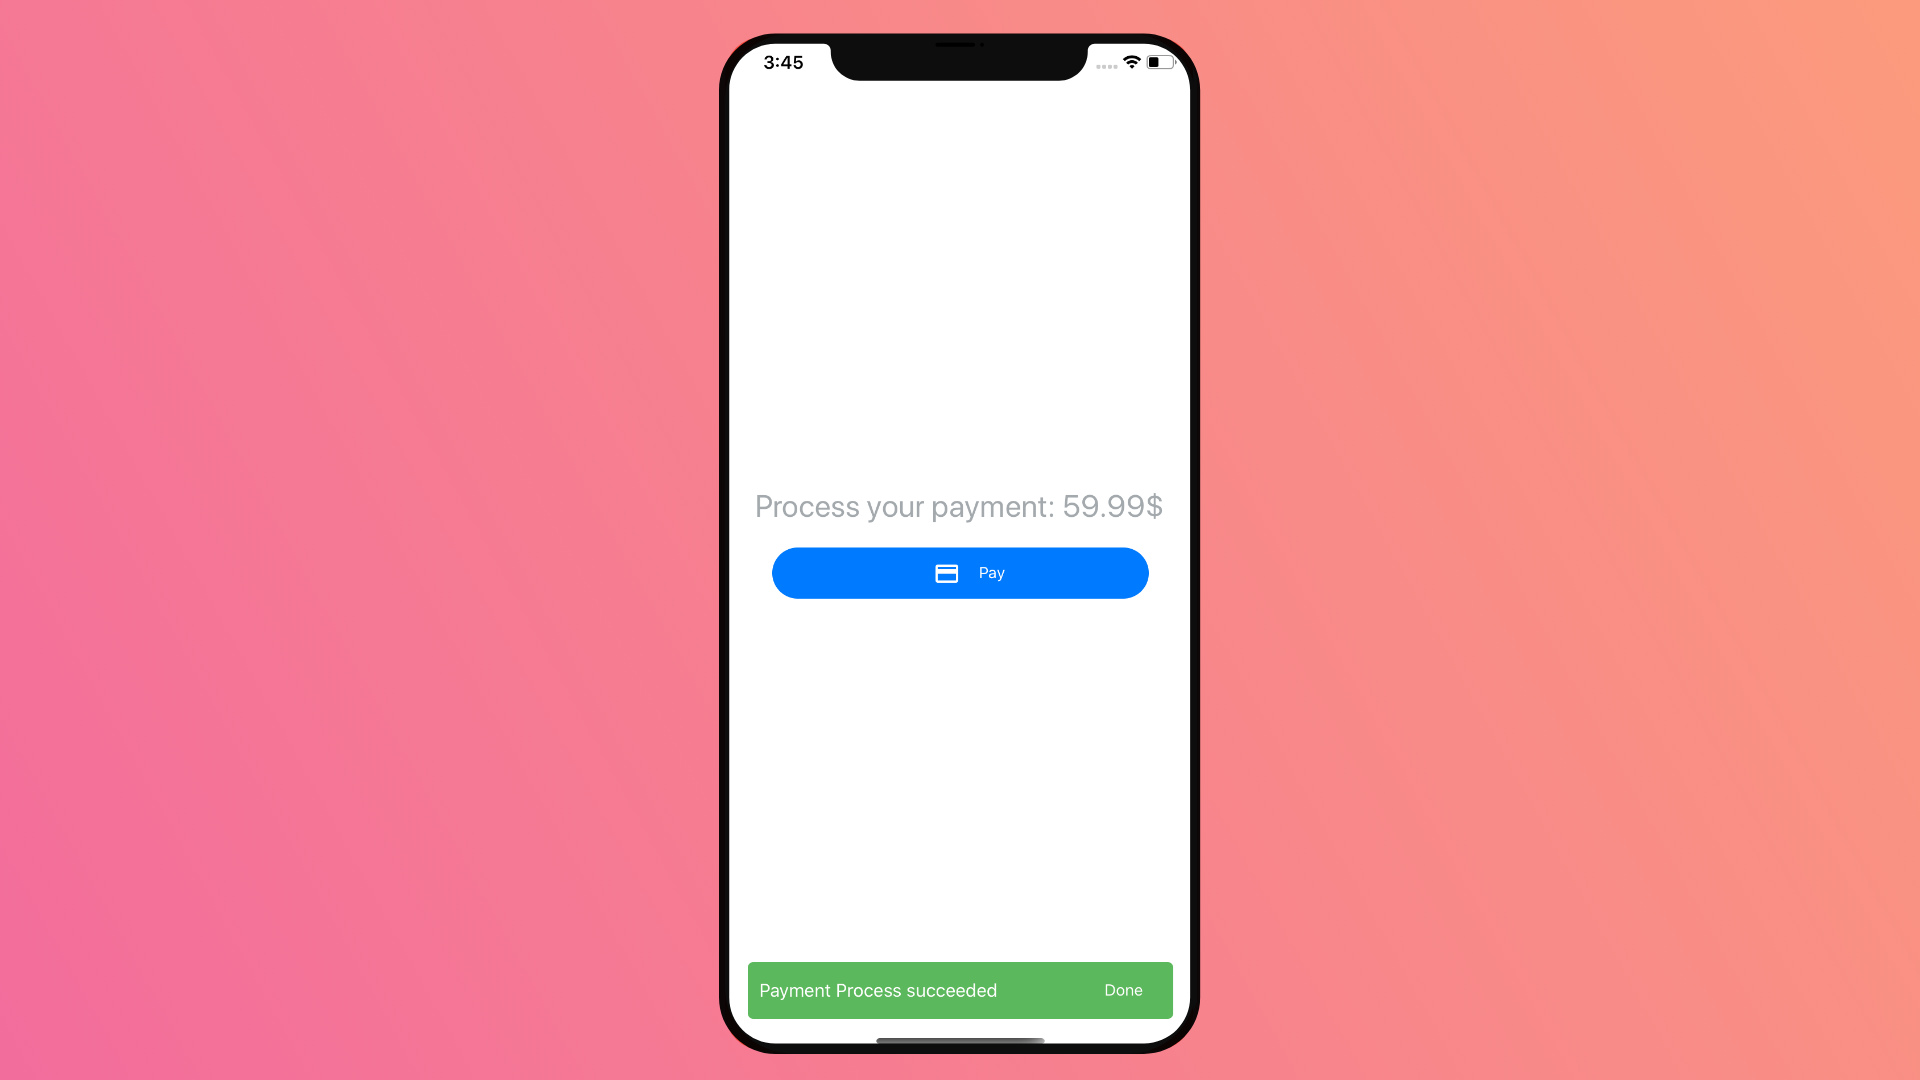
The final result will look like this.

Without further due, let’s get started.
Environment Setup
For this app example, I will be using native-base UI library, If you are not familiar with it. It’s a react native UI library, and it comes with plenty of UI components out of the blue.
To get started Initialize a new project with expo or cli, and then install native base.
For detailed info about native-base installation, please refer to the docs at https://docs.nativebase.io/docs/GetStarted.html.
Snackbar usage
After installing native base, we can use it’s Toast component to make our desired snackbars.
It’s pretty straight forward. But with one extra step.
In order to use the Toast component, you need to wrap the root view of your app with The Root component from native base. It’s very important to remember.
Then we can use it as a function as follows.
<Button onPress={()=> Toast.show({
   text: 'Wrong password!',
   buttonText: 'Okay'
  })}>
  <Text>Toast</Text>
</Button>
As you might have noticed, in order to get a simple snackbar, all we need is two arguments on the Toast.show() function. text and buttonText. There is more configurations we could use, we will use some, when creating our example in the next chapter.
Building The Payment Process App
After you initialize a new react native project and setup native base. We can start creating the final UI of our app.
The app will consist of mainly 2 components. A heading message with the total payment and a button to start the payment process, which will result in either failing or succeeding. That’s where we are going to display our snackbars.
Starting with the render method.
<Root>
  <View style={styles.container}>
    <H1 style={styles.message}>Process your payment: 59.99$</H1>
    <Button full rounded style={styles.payBtn} onPress={() => this.openSnackBar(true)}>
      <Icon name="payment" type="MaterialIcons" />
      <Text style={styles.PayBtnTxt}>Pay</Text>
    </Button>
  </View>
</Root>
As you might have notices, we are using the Root component from native base as a root, since it’s required for the Toast to work, as we discussed in the Environment setup part.
There are also some new Components that it might be the first time you encounter. Such As H1, Button and Icon. Which are just Native base component we can use instead of the default react Native components. As it’s name suggests. H1, H3… are the heading Text components, Button is a wrapper around the Touchable’s in React Native and finally The Icon component, where native base loads components directly to your app, similar to FontAwesome in web development.
Next let’s work on the snackbar function, openSnackbar.
openSnackBar(success) {
    Toast.show({
      text: success ? 'Payment Process succeeded ' : 'Payment Process Failed',
      buttonText: success ? 'Done' : 'Re-try',
      type: success ? 'success' : 'danger',
      duration: 3000

    })
  }
Here the function takes an argument success, which is just a boolean value to indicate wether the payment has been processed or not.
And within the Toast configs, we will be adding two new arguments beyond the text and buttonText ones. The type and duration.
The type has 3 values danger, success, warning and the duration is milliseconds.
As you might have notices, we are using the success value to change the configuration values depending on it’s value.
And finally the stylings.
const styles = StyleSheet.create({
  container: {
    flex: 1,
    alignItems: 'center',
    justifyContent: 'center'
  },
  payBtn: {
    width: '80%',
    alignSelf: 'center'
  },
  PayBtnTxt: {
    color: 'white'
  },
  message: {
    color: '#A3A9AC',
    marginBottom: 20
  }
})
Result


Conclusion
That was it for this article, we have created a nice React Native Snackbar, by building a payment processing app.
I have shared the code example on Github and Expo.Io if you would like to take a look, or use it in your own projects.
Thank you for reading my article, I hope you find it as informative as you have expected.
Stay safe and happy coding.
thank you sir