Table of Contents
Hello again, I welcome each and everyone of you. In this article, we will go through the process of making a React Native Flatlist Example.
As flatlists are vital parts of almost every app nowadays, The List view.
Which can go from a flatlist of your contacts, to your entire app feed.
Flatlist Concept
So, what exactly are we going to build. I have been through some researches to find a good example.
Where we can put all components of an average flatlist, an image, text and buttons.
And finally set my mind to make a sort of a team list of a given company.
You probably came a cross this multiple times.
Where companies put’s a list of their employees with their profile picture, name and position.
This way we can have a good React Native Flatlist Example
Environment Setup
To get started, go ahead and make a new React native project.
After everything is set, you will find yourself with this starting code and screen.
import React from 'react';
import { StyleSheet, Text, View } from 'react-native';

export default class App extends React.Component {
  render(){
    return (
      <View style={styles.container}>
        <Text>Open up App.js to start working on your app!</Text>
      </View>
    );
  }
}

const styles = StyleSheet.create({
  container: {
    flex: 1,
    backgroundColor: '#fff',
    alignItems: 'center',
    justifyContent: 'center',
  },
});

Getting Started
React native flatlist comes with the default react native library, so we won’t need to install anything, but importing it.
Add it to the importing list you already have.
import { StyleSheet, Text, View, FlatList } from 'react-native';To use the flatlist you need 2 primary parts setup.
The flatlist main component, where you hold the data you want to list and the props related to the entire list.
And the renderItem function, which basically tells each item, how to look and interact.
Before we go deep in UI and functionality, let’s make a simple bare text example, then move on from there.
Flatlist Simple Example
Add a simple data to the state of your app component.
  state = {
    data:[
      "Text 1",
      "Text 2",
      "Text 3",
      "Text 4",
      "Text 5",
    ]
  }
Then, replace default text component, with a new flatlist component.
<FlatList
 data={this.state.data}
 renderItem={({ item }) => <Text>{item}</Text>}
 keyExtractor={item => item}
/>
This is the minimum setup you need for a flatlist to be shown on your screen.
Feed the data prop with the data variable from the state, or where ever you have it on.
The renderItem then maps every element of the data you have with an item component
Here, I am mapping the element into a Text component.
keyExtractor prop extracts a key and integrate it on every element, which is vital to any React list to have a key prop.
Here, I have just set it to be the same text we are showing, but if you have an id field in your data, it would be way better.
And you can do that by changing this line.
keyExtractor={item => item}Into this
keyExtractor={item => item.item}This is the result.

Notice: I have a dded some temporary margin to the top of the screen to have it all show.
Building The Team Flatlist Concept
Now, Let’s go for the real thing and update the list to look and feel like we have imagined it.
First, we need the data to show.
[
    {
        "name": "Miyah Myles",
        "email": "miyah.myles@gmail.com",
        "position": "Data Entry Clerk",
        "photo": "https:\/\/images.unsplash.com\/photo-1494790108377-be9c29b29330?ixlib=rb-0.3.5&q=80&fm=jpg&crop=entropy&cs=tinysrgb&w=200&fit=max&s=707b9c33066bf8808c934c8ab394dff6"
    },
    {
        "name": "June Cha",
        "email": "june.cha@gmail.com",
        "position": "Sales Manager",
        "photo": "https:\/\/randomuser.me\/api\/portraits\/women\/44.jpg"
    },
    {
        "name": "Iida Niskanen",
        "email": "iida.niskanen@gmail.com",
        "position": "Sales Manager",
        "photo": "https:\/\/randomuser.me\/api\/portraits\/women\/68.jpg"
    },
    {
        "name": "Renee Sims",
        "email": "renee.sims@gmail.com",
        "position": "Medical Assistant",
        "photo": "https:\/\/randomuser.me\/api\/portraits\/women\/65.jpg"
    },
    {
        "name": "Jonathan Nu\u00f1ez",
        "email": "jonathan.nu\u00f1ez@gmail.com",
        "position": "Clerical",
        "photo": "https:\/\/randomuser.me\/api\/portraits\/men\/43.jpg"
    },
    {
        "name": "Sasha Ho",
        "email": "sasha.ho@gmail.com",
        "position": "Administrative Assistant",
        "photo": "https:\/\/images.pexels.com\/photos\/415829\/pexels-photo-415829.jpeg?h=350&auto=compress&cs=tinysrgb"
    },
    {
        "name": "Abdullah Hadley",
        "email": "abdullah.hadley@gmail.com",
        "position": "Marketing",
        "photo": "https:\/\/images.unsplash.com\/photo-1507003211169-0a1dd7228f2d?ixlib=rb-0.3.5&q=80&fm=jpg&crop=entropy&cs=tinysrgb&w=200&fit=max&s=a72ca28288878f8404a795f39642a46f"
    },
    {
        "name": "Thomas Stock",
        "email": "thomas.stock@gmail.com",
        "position": "Product Designer",
        "photo": "https:\/\/tinyfac.es\/data\/avatars\/B0298C36-9751-48EF-BE15-80FB9CD11143-500w.jpeg"
    },
    {
        "name": "Veeti Seppanen",
        "email": "veeti.seppanen@gmail.com",
        "position": "Product Designer",
        "photo": "https:\/\/randomuser.me\/api\/portraits\/men\/97.jpg"
    },
    {
        "name": "Bonnie Riley",
        "email": "bonnie.riley@gmail.com",
        "position": "Marketing",
        "photo": "https:\/\/randomuser.me\/api\/portraits\/women\/26.jpg"
    }
]
This is a good list example we can use, it has a name, position and photo properties, plus the email, but we wont use for this example.
Building the renderItem
We get started by making a function component, or make a new file for it its totally up to you.
But, I will just put it inside our current app component for simplicity.
Let’s get started with the main item layout styling and add just the name of each team member for now.
function Item({ item }) {
  return (
    <View style={styles.listItem}>
      <Text style={styles.title}>{item.name}</Text>
    </View>
  );
}
Add the Item component outside your app component or on a new file.
Edit the styles object to include the renderItem style, also add grayish background to the root component.
Our screen now looks like this.

renderItem UI Layout Concept
Like I have mentioned before, an average flatlist item will contain 3 view, an image, text and a button.
And my concept is to have the layout split into 3 parts.
Left side will contain the team member Image, the middle part will contain both the name and position of the team member, and on the right side a button to call the user or message him or something like that.
Let’s start with the user photo.
Import the Image component from react native and add it to the Item component
react native image not showing
It’s a common issue when using React Native Images not to show for some reason. And usually there are 2 main issues to consider.
Source prop and dimensions .
If you face a problem where react Native image is not showing make sure you are using your image URI correctly.
To load an image from a remote url, like the case for our current example, you got to put it in the URI field of your source prop
Like here
<Image source={{uri:"www.example.com/image"}} />if however, you want to load the image from a file in your assets folder or inside your project. you have to use require it like this.
<Image source={require("./assets/image.png")} />The other reason your image is not showing in react native is the dimensions.
You should always add the height and width properties to an image, or it wont show.
<Image source={require("./assets/image.png")} style={{height:100, width:100}}/>Now, let’s get back to our renderItem and add what we have so far.
I will also add a borderRadius property to make the photos circle
<Image source={{uri:item.photo}} style={{width:60, height:60,borderRadius:30}} />
All good.
Next, Into the User Photo and position.
Add a flexDirection:”row” property to the listItem styles, to make the layout horizontal, and a borderRadius:5 to give it a kind of round borders.
Then, add a view to hold both user Text Views or Name and Position.
<View style={{alignItems:"center",flex:1}}>
  <Text style={{fontWeight:"bold"}}>{item.name}</Text>
  <Text>{item.position}</Text>
</View>
Now we can work on the right side, where we put a button to call the user.
For that we will need a TouchableOpacity, which we can import from React Native.
Then, add a Text view with value Call and a greenish color.
<TouchableOpacity style={{height:50,width:50, justifyContent:"center",alignItems:"center"}}>
<Text style={{color:"green"}}>Call</Text>
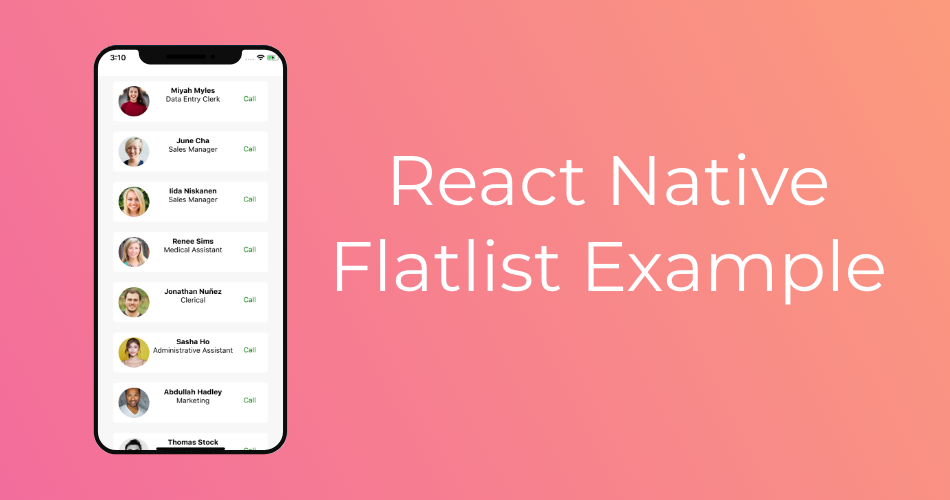
</TouchableOpacity>React Native Flatlist Example Final Result
And there you have it, this is our final result.
I think that’s it for our React Native Flatlist Example, I have prepared both a github project and an Expo.io if you would like to work on the project or test it.
Recommended Articles
React Native Countdown Timer Example Using MomentJs
React Native Camera Expo Example
React Native Accessibilityinfo API
the page does not display the images
Thank you so much. very nice and easy steps. for calling an image from your assets folder needs to be . it works. Appreciated.